秦悦明的运维笔记

marathon 使用docker私仓

官网在
Using a Private Docker Registry

其实很简单,私仓信息会存在本地的~/.docker目录。把这个目录打成tar.gz的包,然后在marathon配置的时候指定一下就可以了。详见:

1 Tar/Gzip credentials

1
2
3
4
docker login some.docker.host.com
Username: foo
Password:
Email: foo@bar.com
1
2
cd ~
tar czf docker.tar.gz .docker
1
cp docker.tar.gz /etc/

2.Mesos/Marathon config

增加一个到认证信息的uris就可以了:

1
2
3
"uris": [
"file:///etc/docker.tar.gz"
]
1
2
3
4
5
6
7
8
9
10
11
12
13
14
15
16
{
"id": "/some/name/or/id",
"cpus": 1,
"mem": 1024,
"instances": 1,
"container": {
"type": "DOCKER",
"docker": {
"image": "some.docker.host.com/namespace/repo",
"network": "HOST"
}
},
"uris": [
"file:///etc/docker.tar.gz"
]
}

urls在图形界面里面有,当然你也可以手动编辑json文件,有语法错误他会提示你.

Mesos 安装

整个过程可以直接看官网

http://mesos.apache.org/gettingstarted/

1.下载源码

http://mesos.apache.org/downloads/

2.安装依赖

Ubuntu 14.04
这里用的openjdk7.

1
2
3
4
5
6
7
8
9
10
11
12
13
14
# Update the packages.
$ sudo apt-get update
# Install a few utility tools.
$ sudo apt-get install -y tar wget git
# Install the latest OpenJDK.
$ sudo apt-get install -y openjdk-7-jdk
# Install autotools (Only necessary if building from git repository).
$ sudo apt-get install -y autoconf libtool
# Install other Mesos dependencies.
$ sudo apt-get -y install build-essential python-dev libcurl4-nss-dev libsasl2-dev libsasl2-modules maven libapr1-dev libsvn-dev

3.Building Mesos

1
2
3
4
5
6
7
8
9
10
# Change working directory.
$ cd mesos
# Bootstrap (Only required if building from git repository).
$ ./bootstrap
# Configure and build.
$ ./configure
$ make

完了以后最好运行下check

1
2
3
4
5
# Run test suite.
$ make check
# Install (Optional).
$ make install

4. 起服务

1
2
3
4
5
6
7
8
# Start mesos master (Ensure work directory exists and has proper permissions).
$ ./bin/mesos-master.sh --ip=0.0.0.0 --work_dir=/var/lib/mesos
# Start mesos agent (Ensure work directory exists and has proper permissions).
$ ./bin/mesos-agent.sh --master=0.0.0.0:5050 --work_dir=/var/lib/mesos
# Visit the mesos web page.
$ http://<ip>:5050

5.mesos架构

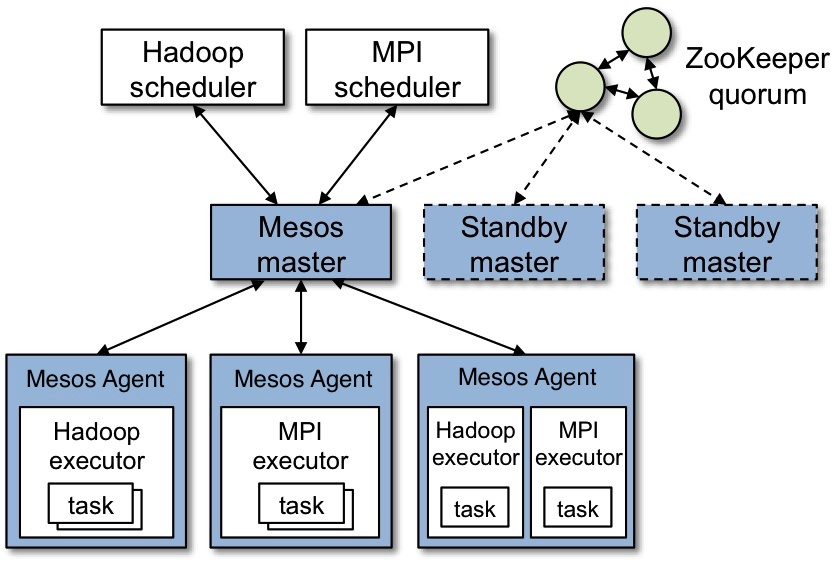
mesos架构

master下面挂了几个agent,会给master上报资源信息.

framework包含了两个概念:

  • scheduler 调度器
  • agent上面的executor.

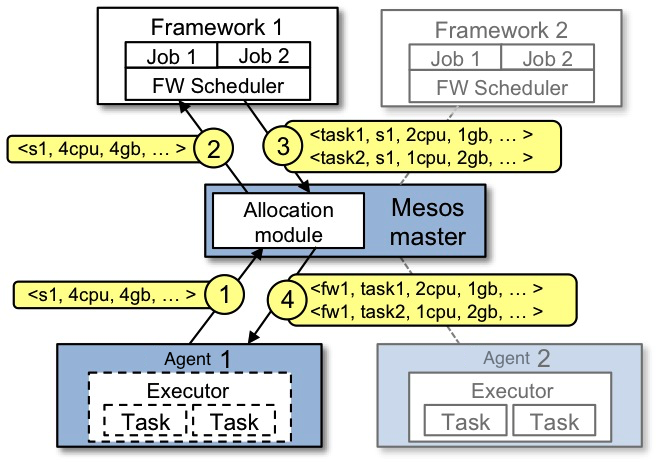
关于framework具体怎样运行还有下面的图来表达这个过程:

这里写图片描述

etcd简单安装

etcd简单安装

1. go 的安装

可以到官网直接下载二进制包: https://golang.org/dl/

https://storage.googleapis.com/golang/go1.6.3.linux-amd64.tar.gz

设置环境变量:

1
export PATH=$PATH:/usr/local/go/bin/

2.etcd 的安装

这里用编译的方式:

1
2
3
git clone https://github.com/coreos/etcd.git
cd etcd
./build
1
bin/etcd

会起两个端口,2379,2380.

bin/etcdctl set mykey ‘123’
bin/etcdctl get mykey

3.etcd简介

看文档https://coreos.com/etcd/docs/latest/
A distributed, reliable key-value store for the most critical data of a distributed system.

其实就是一个高效的kv store,可以做分布式部署。可以做成集群。

[负载均衡]haproxy

这东西非常强大..配置语法跟之前tengine的类似.

1.健康检查的例子:

主要是使用check关键字:

1
2
3
4
5
6
7
8
9
10
11
12
13
14
15
16
17
18
19
20
21
22
23
24
25
26
27
28
29
30
31
32
33
34
35
36
37
38
39
40
41
42
43
44
45
46
47
48
49
50
51
52
53
54
55
56
57
58
59
60
61
62
63
64
65
66
67
#
# demo config for Proxy mode
#
global
maxconn 20000
# ulimit-n 20000
# ulimit-n 16384
log 127.0.0.1 local0
# log /tmp/haproxy.log
uid 200
gid 200
# chroot /var/empty
nbproc 4
daemon
frontend test-proxy
bind 0.0.0.0:81
# bind 192.168.200.10:8080
mode http
log global
option httplog
option dontlognull
option nolinger
option http_proxy
maxconn 8000
timeout client 30s
# layer3: Valid users
# acl allow_host src 192.168.200.150/32
# http-request deny if !allow_host
# layer7: prevent private network relaying
# acl forbidden_dst url_ip 192.168.0.0/24
# acl forbidden_dst url_ip 172.16.0.0/12
# acl forbidden_dst url_ip 10.0.0.0/8
# http-request deny if forbidden_dst
default_backend test-proxy-srv
backend test-proxy-srv
mode http
timeout connect 5s
timeout server 5s
retries 2
# option nolinger
option http_proxy
# layer7: Only GET method is valid
acl valid_method method GET
http-request deny if !valid_method
# layer7: protect bad reply
# http-response deny if { res.hdr(content-type) audio/mp3 }
balance roundrobin #负载均衡的方式,roundrobin平均方式
# cookie SERVERID #允许插入serverid到cookie中,serverid后面可以定义
#心跳检测的URL,HTTP/1.1¥r¥nHost:XXXX,指定了心跳检测HTTP的版本,XXX为检测时请求
#服务器的request中的域名是什么,这个在应用的检测URL对应的功能有对域名依赖的话需要设置
option httpchk GET / HTTP/1.0
#服务器定义,cookie 1表示serverid为1,check inter 1500 是检测心跳频率
#rise 3是3次正确认为服务器可用,fall 3是3次失败认为服务器不可用,weight代表权重
server mms1 127.0.0.1:6000 cookie 1 check inter 3000 rise 3 fall 3 weight 1
server mms2 127.0.0.1:6001 cookie 2 check inter 3000 rise 3 fall 3 weight 2

关于haproxy其实还是不太理解,可以从简单的着手。

2.配置一个简单的本地代理

可以写成这样,一个frontend+一个backend:

1
2
3
4
5
6
7
8
9
10
11
12
13
14
15
16
17
18
19
20
# Simple configuration for an HTTP proxy listening on port 80 on all
# interfaces and forwarding requests to a single backend "servers" with a
# single server "server1" listening on 127.0.0.1:8000
global
daemon
maxconn 256
defaults
mode http
timeout connect 5000ms
timeout client 50000ms
timeout server 50000ms
frontend http-in
bind *:81
default_backend servers
backend servers
server server1 127.0.0.1:80 maxconn 32

也可以写成单独的listen:

1
2
3
4
5
6
7
8
9
10
11
12
13
14
15
# The same configuration defined with a single listen block. Shorter but
# less expressive, especially in HTTP mode.
global
daemon
maxconn 256
defaults
mode http
timeout connect 5000ms
timeout client 50000ms
timeout server 50000ms
listen http-in
bind *:81
server server1 127.0.0.1:80 maxconn 32

3.日志记录

这里还缺了一个很关键的日志记录,日志需要和syslog软件相结合。
需要配置一下rsyslog:

1
2
3
$ModLoad imudp
$UDPServerRun 514
local1.* /var/log/haproxy.log

然后在代码中配置相关内容即可:

1
2
3
4
5
6
7
8
9
10
11
12
13
14
15
16
17
18
19
20
21
22
23
# Simple configuration for an HTTP proxy listening on port 80 on all
# interfaces and forwarding requests to a single backend "servers" with a
# single server "server1" listening on 127.0.0.1:8000
global
daemon
maxconn 256
log 127.0.0.1 local1
defaults
log global
mode http
timeout connect 5000ms
timeout client 50000ms
timeout server 50000ms
option httplog
frontend http-in
bind *:81
default_backend servers
backend servers
server server1 127.0.0.1:80 maxconn 32

4.配置statistics

1
2
3
4
5
6
7
8
listen stats
bind *:82
mode http
stats enable
stats hide-version
stats realm Haproxy\ Statistics
stats uri /
stats auth admin:Qq123456

haproxy提供一个很方便的monitor界面,比nginx_status好看多了.内容也丰富很多.很直观.

[负载均衡]tengine和nginx

1.nginx

1
2
3
4
5
6
7
8
9
10
11
12
13
upstream backend
{
server 127.0.0.1:6000;
server 127.0.0.1:6001;
}
server{
location / {
proxy_pass http://backend;
proxy_read_timeout 5s;
# root html;
# index index.html index.htm;
}
}

这里不用nginx,原因是nginx自带的健康检查,是以正常请求来试的,这会导致很多问题.这里不详细说.

2.tengine

tengine的非常简单.加个check语句就行了.

http://tengine.taobao.org/document_cn/http_upstream_check_cn.html

1
2
3
4
5
Syntax: check interval=milliseconds [fall=count] [rise=count] [timeout=milliseconds] [default_down=true|false] [type=tcp|http|ssl_hello|mysql|ajp] [port=check_port]
Default: 如果没有配置参数,默认值是:interval=30000 fall=5 rise=2 timeout=1000 default_down=true type=tcp
Context: upstream

该指令可以打开后端服务器的健康检查功能。
指令后面的参数意义是:
interval:向后端发送的健康检查包的间隔。
fall(fall_count): 如果连续失败次数达到fall_count,服务器就被认为是down。
rise(rise_count): 如果连续成功次数达到rise_count,服务器就被认为是up。
timeout: 后端健康请求的超时时间。
default_down: 设定初始时服务器的状态,如果是true,就说明默认是down的,如果是false,就是up的。默认值是true,也就是一开始服务器认为是不可用,要等健康检查包达到一定成功次数以后才会被认为是健康的。
type:健康检查包的类型,现在支持以下多种类型
tcp:简单的tcp连接,如果连接成功,就说明后端正常。
ssl_hello:发送一个初始的SSL hello包并接受服务器的SSL hello包。
http:发送HTTP请求,通过后端的回复包的状态来判断后端是否存活。
mysql: 向mysql服务器连接,通过接收服务器的greeting包来判断后端是否存活。
ajp:向后端发送AJP协议的Cping包,通过接收Cpong包来判断后端是否存活。
port: 指定后端服务器的检查端口。你可以指定不同于真实服务的后端服务器的端口,比如后端提供的是443端口的应用,你可以去检查80端口的状态来判断后端健康状况。默认是0,表示跟后端server提供真实服务的端口一样。该选项出现于Tengine-1.4.0。

官方的解释非常荆楚了.
有个例子可以抄,就是

1
check interval=3000 rise=2 fall=5 timeout=1000 type=http;

加了check以后服务器3秒一次的在check,有error的话会写在error log里面.

1
2
3
2016/07/31 16:13:40 [error] 15940#0: send() failed (111: Connection refused)
2016/07/31 16:07:47 [error] 15940#0: send() failed (111: Connection refused)

非常的爽.tengine的健康检查模块没有nginx的那种问题.

其实阿里云的slb就是用tengine + lvs来做的,里面的健康检查配置是和tengine一模一样的.如图:

这里写图片描述